What Can You Do With Your Corner Pop Tool?

I often get asked about how to make flying geese that are an odd size. Or someone may only need to make one or two of them of a certain color. I love my Wing Clipper tool, but for something like this, I will use my Corner Pop tool instead. Check out this video I made on how to use your Corner Pop tool to make flying geese.


Precision Pinning – Storm at Sea

This last week I have been teaching a pattern called Smooth Sailing by a fellow Certified Instructor, Pam Goggans. One of the things that makes this such a lovely quilt is all of the points that come together between pieces. The great thing about Studio 180 Design tools is you get a perfect 1/4″ on your units so you don’t lose your points. But what do you do when you have two points that are coming together like you have on this quilt? Take a look at my finished wall hanging, a different size of the quilt, adapted by the fabulous CIs over at Running With Scissors.

You can see that there are a lot of points that come together in this quilt. If you lose the points the effect is lost. Here’s a video that talks about precision pinning and pressing. If you have any questions feel free to send me an email under my contact info. Enjoy!


Blocks and Borders – A Garden Gems Blog Hop

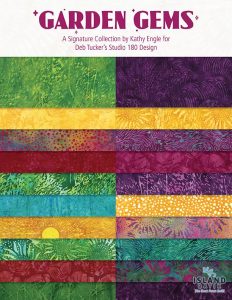
I was so thrilled to be asked to be a part of this week’s blog hop. We were asked to choose one of the Blockbusters and add borders using the gorgeous Garden Gems line by Island Batik.

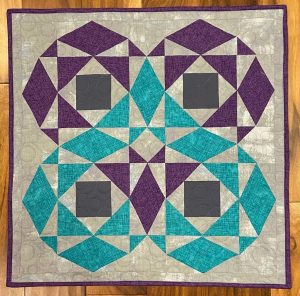
The first thing I did was check out the Blockbusters to decide which block I wanted to use. I knew I wanted my finished piece to feel like a full finished quilt. So I narrowed down my options to some of the more complex blocks. In the end I chose Crosspoints because I hadn’t done much with the Triangle Pizzazz Technique Sheet and I really wanted to play with that particular unit.

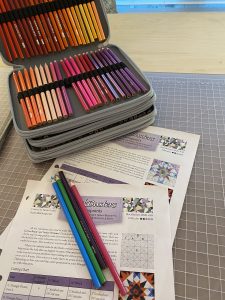
I love the Blockbuster series for so many reasons. There are different color combinations shown for each block,  which usually serve as inspiration for my own experiments. When I print out a Blockbuster the first thing I do is get out my colored pencils.  I use the black line master to play with color placement.

I looked at all my options for fabrics within the Garden Gems line and chose my four favorites plus a multi.

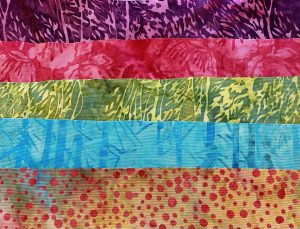
I chose what colors I wanted to feature in different parts of the block and went to work. I chose to make the 15″ finished block size so I could have a decent size wall hanging in the end. Working with batik fabrics is something I truly love.  Jewel tones feature prominently in my fabric stash so the bright colors of the Garden Gems line were fun to work with. It was hard to narrow it down to just five fabrics!

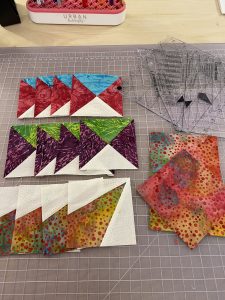
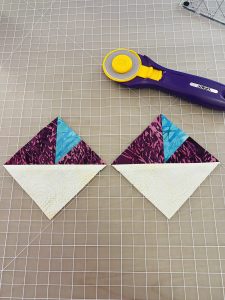
Playing with Triangle Pizzazz felt so familiar because it is similar in construction to the Shaded Four Patch. The satisfaction of getting that perfect point in the middle of the unit was a great feeling.

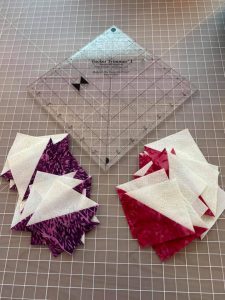
I assembled the whole block and began thinking about border options. I knew when I picked the block I wanted to work with half square triangles. I felt like they would compliment the overall finished block and it would allow me to continue working with my Tucker Trimmer.

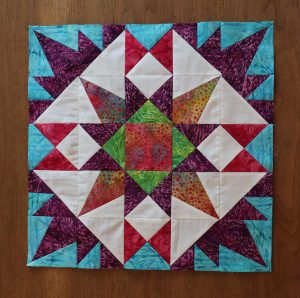
With the size of this block being 15 inches I felt like 2 inch half square triangles would work well. I wanted to add some fabric between the block and the half square triangles so the block would stand out and to have an even number to work with for adding the border. Since 15 isn’t divisible by 2 I began to add just some straight borders using trial and error. I ended up with a larger border in green at 1 inch and smaller border in blue at 1/2 inch. When I’m working with larger quilts I usually do the math prior to cutting my fabric, but with something as small as this finished block I was able to play without doing the math first.

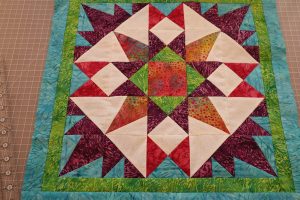
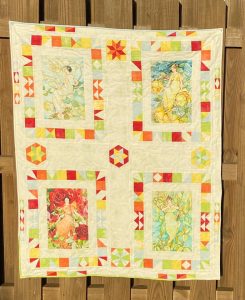
I wasn’t sure what colors to use for the half square triangles, but I ended up going with the pink and purple and then another added border of the multi in the end. I used my Eight at Once Technique Sheet to make the half square triangles. It went so fast! I also ended up adding hourglass units as cornerstones as a last minute decision. They ended up playing well with the hourglass units in the block.


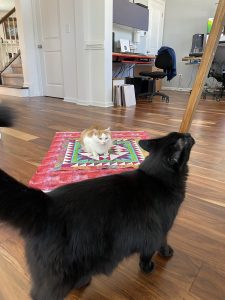
When the top was complete I sat down with my husband who long arms all my quilts for me. We chose a thread color and a pantograph that we felt complimented the finished piece well. Any of you who take classes with me know that my cats love to hang out when we quilt or when I teach. Doodlebug and Henry decided to get in on the action when we were cutting fabric for the backing.

The finished project came out much better than I had even envisioned. I ended up binding it with the blue fabric, although I also thought about using the green. In the end I’m really happy with all of the color placement, the borders, and the fabrics I chose.

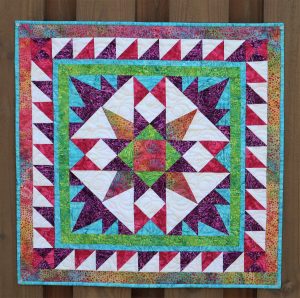
Adding borders to a quilt can often take your projects from feeling incomplete to polished. Most of the time I play with EQ8 when designing a quilt, but because I was working with a smaller finished project I was able to just jump in and begin working with the fabrics as soon as they arrived. Trial and error is a part of the process, but when I’m working with such gorgeous fabrics it all feels like play and not work. The finished piece is something I’m really proud of and I can’t wait to hang it in my sewing room.

Yesterday Sarah Furrer talked about her process on the Studio 180 blog. You can find her post here:

Blocks and Borders with Garden Gems

And tomorrow another fellow CI Chris Combs will be talking about her process on her Facebook page:

The Quilter’s Nook

Sarah will finish out the week on the Studio 180 blog. I hope you’ll take a look at what they created to get some more ideas on adding borders to your blocks and quilts.

Filigree

Long time no post! I’ve been so busy teaching and making quilts that the poor blog has fallen behind. I’ve been loving patterns by Sarah Furrer lately. She’s an in house CI at Studio 180. Her design aesthetic is so pleasing and modern. This is called Filigree and it uses the Corner Beam tool and the Large Square Squared tool. I used some old Jason Yenter fabrics I had in my stash and I also used a gorgeous Kona Solid called Chalkboard.

So what has been going on in my little corner of the quilting world? I’ve been doing a lot of virtual teaching through Wish Upon a  Quilt.  Tucker Tool Club is still my most sought after set of classes. We will be starting a new session in June. I’m very excited to start again because I get to introduce a whole new group of people to the Studio 180 system. And I get to use Laurie’s gorgeous panels. Laurie is one of the shop owners and she designs fabrics. Because we work together on some of these projects, they are exclusive to Wish. It has opened up a lot of new possibilities for me and it’s very exciting.

I’ve also been teaching a series on the Lemoyne Star tool. It was my intro to Studio 180 and my favorite tool.

Life has been busy, but I love having such wonderful projects to work on. But I take time every day to do things for myself, such as yoga. I started doing it back in December when I was having some back issues and kept up with it when I started feeling better. Now I’m doing daily practice. Tomorrow my husband and I go to get our first dose of the COVID vaccine. We are both excited. It’s a promise that things can’t stay the way they are forever.

Spring is arriving and with it all the flowers and trees will start to come back. Spring is my favorite season. Seeing all the new growth after winter always makes me feel hopeful.


Why Studio 180 Design Tools?

Have you ever begun a quilt so excited to watch it take shape, and half way through get frustrated because your points don’t match, your seam intersections are off, or your blocks aren’t all the same size? When I first began quilting I thought that those things would come with time and practice. And in some ways they did. I learned about that all important scant 1/4″ seam allowance. I learned the best practices for pressing. I learned about the grain of the fabric and bias. But still, sometimes my blocks weren’t the same size or if I was making a complicated block the points would be off. My biggest frustration came in the form of a Lemoyne star block. No matter how many times I tried to make it work, I couldn’t. Wish Upon a Quilt was having a series of classes on the Studio 180 Design Rapid Fire Lemoyne Star tool, taught by a former CI (Certified Instructor). I signed up and I was hooked from the very first stitch.

So what’s the big deal with the Studio 180 Design tools? Why are people so passionate about them? Most tools out there require you to cut precise sizes of the pieces of your units and then sew them together using that perfect scant 1/4″ seam. For things like half square triangles  you’ll often see a 7/8″ measurement included in your instructions. With Studio 180 Design tools you start out but cutting pieces that are slightly larger than they need to be and then once your units are sewn together, you use the tool to trim them down to a precise size. Because all of your units are then trimmed to the exact size you need, your blocks go together with more accuracy and less frustration. Besides that, these tools make quilting fun! I quilt because I enjoy it. It’s an escape from daily stress. And while sometimes it is my job, it’s also my hobby. Who wants to have their hobby be frustrating?

Once you start with a Tucker Tool (Deb Tucker is the founding genius behind Studio 180 Designs) you want to learn more of them. There are a total of 21 tools in the Studio 180 arsenal. Some of them are variations on the same tool, like the Square Squared, Corner Pop, Hunter’s Star, Tucker Trimmer, and the Wing Clipper.  Any quilt out there I see I try to “Tuckerize” it. I convert it to use my Tucker Tools.

If you’re interested in learning these amazing tools, Laurie of Laurie Kent Designs and I came up with a fantastic quilt to teach you 11 of the most basic Tucker Tools. Laurie is one of the owners at Wish Upon a Quilt and she is also a fabric designer. Using one of her panels and gorgeous coordinating fabrics that Laurie chose, I came up with this quilt.

Over the course of a year you will learn all the different tools that go into making the quilt, how to use them, and how to apply them to other patterns. We decided to call it the Tucker Tool Club and this is exclusive to Wish Upon a Quilt. All the classes are being taught over Zoom, so even if you aren’t local to us you can still participate! There are only a few spots left. The membership into the club gets you all the fabric to make the quilt top, access to the private Facebook page for members only where I will be posting extra video content, and 10% off Studio 180 Tools and Technique Sheets for the year. The classes are an additional fee, but if you already know how to use the tool for the month, you don’t have to take the class. Classes are available during the day, evening, and a weekend. If you’re interested, come take a look at the info on the club!

Tucker Tool Club at Wish Upon a Quilt


Welcome to Murgaboo Quilts!

I’m so glad you stopped by my website and blog. About 6 years ago my husband bought me a sewing machine for Christmas. I wanted to learn how to quilt. I went online to find local quilt shops and Wish Upon a Quilt popped up just a few miles from our house and they had a beginning quilting class starting up. So I joined the class. At the time the old owner Cathy was teaching. I fell in love with quilting and quickly acquired a fabric stash. I began taking more classes and learned about Studio 180 tools and Deb Tucker. While I was at the Wish retreat in 2019, Cathy asked me to do a demo on the Studio 180 Rapid Fire Lemoyne Star tool and afterwords people asked her if I would be teaching in the shop. She purchased the Tucker University curriculum and I began teaching. I had only been teaching a few months when the shop was sold. Little did I know that the new owners would be a huge boost to my teaching. Frank and Laurie are wonderful to work for and they have been so supportive of my ideas.

In February of 2020 I spent a wonderful week training to become a Studio 180 Certified Instructor. It was by far the most wonderful week of my creative life. I made wonderful friends and learned more than I ever thought possible.

In March of 2020 when the pandemic hit Frank and Laurie knew we would have to make some changes. We could no longer teach in the shop with the social distancing protocols in place. So Costa Constantinou and I began making videos and short tutorials to post to the Facebook page. Those videos are the ones you see right here on my site! My husband and I began talking to Frank about the possibility of teaching over Zoom. We set  up a couple of cameras in my sewing room and several of my former students and some great customers at Wish agreed to be guinea pigs for our little experiment. It went over very well and now we are beginning to teach over Zoom on a regular basis. It’s wonderful because we can reach so many more people this way. I didn’t think I would enjoy it as much as I do. My students are amazing and I love having a new way to connect with them.

Laurie and I came up with an idea for a quilt using all the Tucker Tools and one of her amazing panels that she designed. We now have a year long series running at the shop called Tucker Tool Club. I will be teaching it once a month over Zoom. If you’re interested in learning more about it, head over to www.wishuponaquilt.com and click on the Clubs tab. It’s listed there. We only have a few more spots left open and it promises to be a fun year!

I hope to be able to share the things I’m working on, upcoming classes, tips and tricks, and a few videos here with you. Education is my passion and I love helping my students learn more productive and precise ways to piece their quilts. I’ll be talking about things happening at the shop, things happening at Studio 180 Design, and there will be no shortage of cat pictures and pictures of my husband working on my quilts on our long arm. Thanks for joining me on this new adventure!